1.0 OBJECTIVE: To lay down a procedure for cleaning, operation and calibration of balance (3100.00 g).
2.0 SCOPE: The procedure is applicable to the cleaning, operation and calibration of balance (3100.00 g) in the Production area.
3.0 RESPONSIBILITY:
Operator, Officer, Executive – Production Department
Manager – Production Department
4.0 DEFINITION(S):
NA
5.0 PROCEDURE:
5.1 Cleaning
5.1.1 Ensure that the electric connection is disconnected from the balance.
5.1.2 Remove the weighing pan, and breeze ring and clean the platform with a clean dry lint-free cloth.
5.1.2 Clean the weighing pan, and breeze ring gently with a dry clean lint-free cloth.
5.1.3 Clean the main unit of the balance with dry clean lint-free cloth.
5.1.4 Reassemble the dismantled ring and weighing pan.
5.2 Operation
5.2.1 Clean the balance platform / weighing pan with a dry lint-free cloth.
5.2.2 Ensure that the table provided for mounting of balance should not vibrate and shake during calibration and operation.
5.2.3 Ensure that the air bubble of the spirit label is in the red circle. If not, adjust the air bubble in the right position by turning leveling feet clockwise or anticlockwise.
5.2.4 Connect the adaptor to the balance and turn ‘ON’ the main electric supply. Switch on the balance, the display will show ‘- – – – -‘. Press the ‘ON / OFF’ key, and the display show ‘0.00 g’. Allow the balance to stabilize for 10-15 minutes (standby) with nothing on the weighing pan.
5.2.5 Ensure the balance screen is displaying ‘0.00 g’ before every weighing operation. If not, press the ‘RE-ZERO’ key to set ‘0.00 g’.
5.2.6 Place the objective to be weighing gently on the weighing pan.
5.2.7 Balance will weigh the object and display the measured weight on the screen.
5.2.8 Turn the balance into standby mode while not in use.
5.2.9 Turn ‘OFF’ the balance at the end of the operation and clean it with dry, clean lint-free cloth.
5.3 Calibration
5.3.1 Auto Calibration
5.3.1.1 Ensure cleanliness of balance.
5.3.1.2 Ensure that the table provided for mounting of balance should not vibrate and shake during calibration and operation.
5.3.1.3 Ensure that the air bubble of the spirit label is in the red circle. If not, adjust the air bubble in the right position by turning leveling feet clockwise or anticlockwise.
5.3.1.4 Connect the adaptor to the balance and turn ‘ON’ the main electric supply. Switch on the balance, the display will show ‘- – – -‘. Press the ‘ON / OFF’ key, and the display show ‘0.00 g’. Allow the balance to stabilize for 10-15 minutes (standby) with nothing on the weighing pan.
5.3.1.5 Press the ‘CAL’ key to start calibration. Balance will display ‘CAL in’. Balance will automatically turn back to weighing mode after calibration.
5.3.1.6 Balance will display ‘END’ on completion of auto-calibration.
5.3.1.7 Test the accuracy of weighing by using the certified weights.
5.3.2 General Calibration
5.3.2.1 Press and hold the ‘CAL’ key until the balance displays ‘CAL out’, which will automatically change to ‘CAL 0’. Press the ‘SAMPLE’ key. The screen will display ‘2000.00 g’. Select a weight (1000.00 g / 2000.00 g / 3000.00 g) by pressing the ‘RE-ZERO’ key followed by the ‘PRINT’ key. The selected weight will store in the balanced memory.
5.3.2.2 Press and hold the ‘CAL’ key until the balance display ‘CAL out’, which will automatically change to ‘CAL 0’. Automatically selected weight of step no. 5.3.2.1 will appear on screen.
5.3.2.3 Gently place the displayed standard weight in the center of the weighing pan.
5.3.2.4 Press the ‘PRINT’ key. Balance will measure the weight and on completion of calibration screen will display ‘END’.
5.3.2.5 Remove the standard weight from the weighing pan. The screen will show ‘0.00 g’.
5.3.2.6 Place 100.00 g standard weight on the weighing pan. The balance will measure the weight and display the measured weight on the screen.
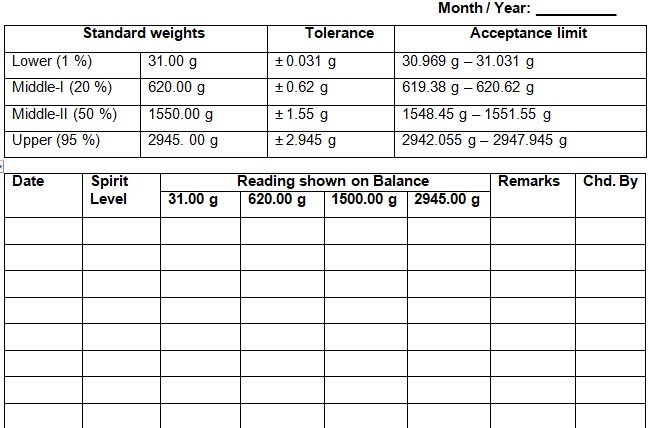
5.3.2.7 Measure the weight of the standard weight of 31.00 g, 620.00 g, 1550.00 g, and 2945. 00 g by following step no. 5.3.2.6.
5.3.3 Daily Verification
5.3.3.1 Measure the weight of standard weight of 31.00 g, 620.00 g, 1550.00 g, and 2945. 00 g.
5.3.3.2 If the balance measures weight of standard weight within limit write ‘OK’ in remarks column of annexure-I.
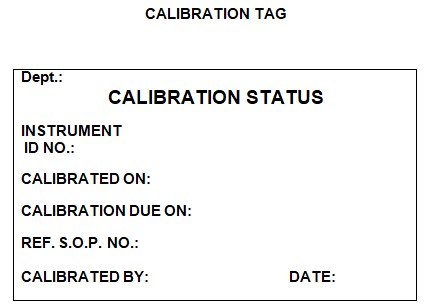
5.3.3.3 Place duly filled and signed ‘CALIBRATION TAG’ on the balance as per annexure-II.
5.3.3.4 If the balance does not measure the weight of any standard weight within limit, write ‘Auto / External calibration required’ in Remarks column of annexure-I. Perform ‘Auto Calibration’ followed by ‘External Calibration’ by following step no. 5.3.1 and 5.3.2.
5.3.3.5 Record the calibration results in annexure-I.
5.3.5 Frequency
Daily Calibration: Daily
Auto and General Calibration: Daily
If the instrument is out of calibration, affix ‘UNDER MAINTENANCE’ and inform the engineering department through IOM.
Related SOP: SOP on Making entries in equipment usage and cleaning log sheet
6.0 ABBREVIATION(S):
g: Gram
QA: Quality Assurance
SOP: Standard Operating Procedure
IOM: Inter Office Memo
7.0 REFERENCE(S):
NA
8.0 ANNEXURE(S):
Annexure-I: Daily Calibration Record (Balance Capacity: 3100.00 g)
Annexure-II : Calibration Tag


