1.0 OBJECTIVE: The objective is to establish a procedure for the operation, calibration, and cleaning of an electronic balance.
2.0 SCOPE: This Standard Operating Procedure (SOP) applies to the operation and calibration of an electronic balance in the Quality Control Department.
3.0 RESPONSIBILITY:
The responsibility lies with the Officer and Executive of the Quality Control Department, as well as the Head of the Quality Control Department.
4.0 DEFINITIONS:
Not applicable.
5.0 PROCEDURE:
5.1 Operation:
5.1.1 Verify the calibration status of the instrument.
5.1.2 Ensure that the instrument is clean and free from dust.
5.1.3 Switch on the mains and level the balance by adjusting the bubble position to the center.
5.1.4 Press the power button of the instrument and wait for the weighing mode to display 0.0000 g on the balance screen. The balance is now ready for operation.
5.1.5 Place an empty container or butter paper on which the sample weight is to be taken. Press the tare button to zero the display and then place the sample as required. Note the weight displayed.
5.1.6 After weighing is complete, press the tare button to bring the display back to 0.0000 and press the power button until ‘OFF’ appears.
5.1.7 Operate the balance within the range of 1 mg to 210 g.
5.2 Calibration:
5.2.1 Auto Calibration:
5.2.1.1 Switch on the instrument and wait for the weighing mode to appear.
5.2.1.2 Press the ‘CAL’ button on the instrument.
5.2.1.3 The instrument will start auto-calibrating by shifting the point from decimal to decimal.
5.2.1.4 Calibration is successful.
5.2.2 Daily Calibration Record:
5.2.2.1 Perform the daily calibration record of the balance.
5.2.2.2 After completing the internal calibration, press the tare button to zero the display.
5.2.2.3 Place a 20 mg standard weight on the pan using forceps.
5.2.2.4 Note the displayed weight once the display is stable.
5.2.2.5 Repeat the operation with 100 mg, 500 mg, 5 g, and 50 g standard weights. Note the displayed weight after the display is stable and record it in Annexure-I. Affix the ‘CALIBRATION TAG’ as per Annexure-III.
5.2.3 General Calibration:
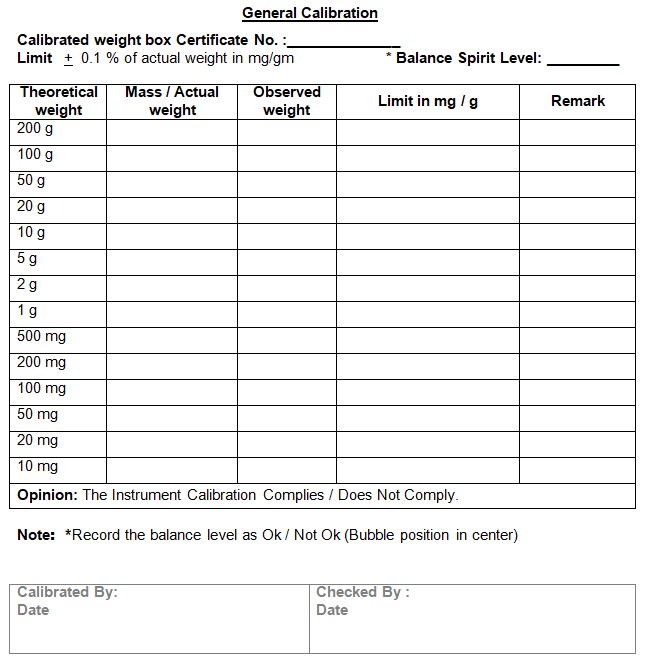
5.2.3.1 Calibrate the balance with each individual standard weight (200 g, 100 g, 50 g, 20 g, 10 g, 5 g, 2 g, 1 g, 0.5 g, 0.2 g, 0.1 g, 0.05 g, 0.02 g, 0.01 g) and record the readings in Annexure-II.
5.2.4 Uncertainty:
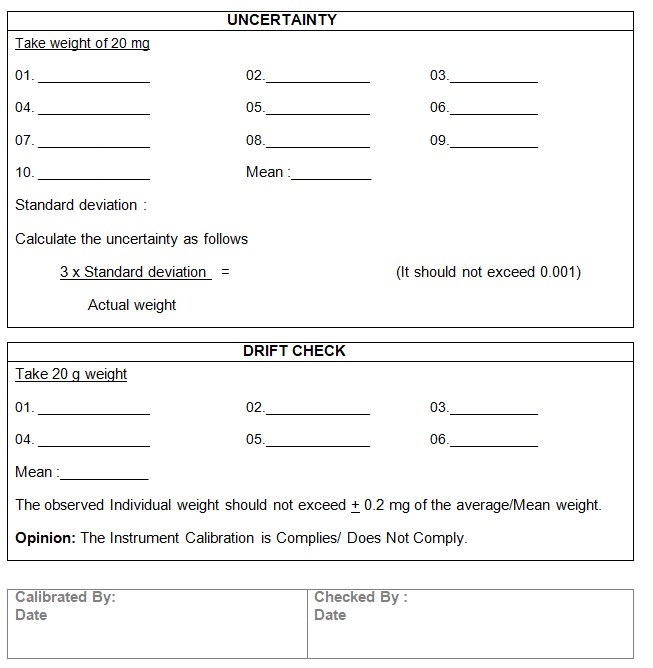
5.2.4.1 Use a 20 mg standard weight for the uncertainty test.
5.2.4.2 Take at least 10 replicate readings on the balance and note them down.
5.2.4.3 Calculate the standard deviation of the above 10 readings.
5.2.4.4 Calculate the uncertainty as follows:

5.2.4.5 The uncertainty should not exceed 0.001. Record the result in Annexure-II.
5.2.5 Drift Check:
5.2.5.1 After completing the internal calibration, press the tare button to zero the display.
5.2.5.2 Place a 20 g standard weight on the pan.
5.2.5.3 Read the displayed weight once the display is stable and note it down.
5.2.5.4 Repeat the above procedure five times at different places on the pan and calculate the average displayed weight.
5.2.5.5 The average displayed weight will be considered the average actual weight for the particular balance.
5.2.5.6 The observed weight should not exceed ±0.2 mg of the average weight and record it in Annexure-II.
5.2.6 Tolerance:
5.2.6.1 The auto-calibration test should pass for the balance.
5.2.6.2 The daily calibration record of the balance should be within ±0.1% of the actual weight.
5.2.6.3 The general calibration should be within ±0.1% of the actual weight.
5.2.6.4 The uncertainty test should not exceed 0.001.
5.2.6.5 The drift check should be within ±0.2 mg of the average weight of 20 g.
5.2.7 Frequency:
5.2.7.1 Perform auto calibration and daily calibration record daily.
5.2.7.2 Perform general calibration, uncertainty, and drift check every three months.
5.3 Cleaning:
5.3.1 Clean the balance pan properly with a soft brush.
5.3.2 Clean the glass doors with a soft cotton cloth.
5.4 Precautions:
5.4.1 Place the balance on a stable, vibration-free, and leveled support.
5.4.2 Do not place the balance in a hazardous area.
5.4.3 Clean the pan properly before and after use.
5.4.4 Always keep the glass doors of the balance closed.
6.0 ABBREVIATIONS:
g: Grams
mg: Milligrams
SOP: Standard Operating Procedure
NA: Not Applicable
Related SOP: SOP on Making entries in equipment usage and cleaning log sheet
7.0 REFERENCES:
Not applicable.
8.0 ANNEXURES:
Annexure-I: Daily Calibration Record
Annexure-II: General Calibration, Uncertainty & Drift Checks
Annexure-III: Calibration Tag


