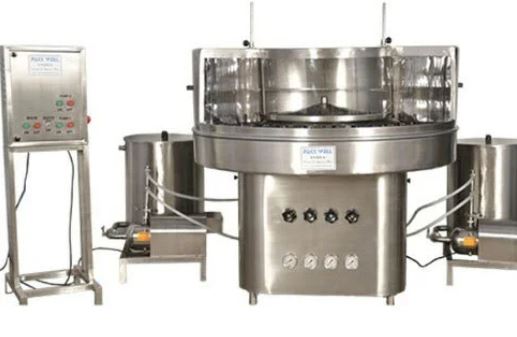
1.0 OBJECTIVE: To lay down the procedure for cleaning and operation of linear bottle washing Machine
2.0 SCOPE: This procedure is applicable for cleaning and operation of the linear bottle washing machine in the Liquid department.

3.0 RESPONSIBILITY
Operator, Officer, Executive- Production Department
Officer, Executive- Quality Assurance Department
Manager –Production and Quality Assurance Department.
4.0 DEFINITION(S)
NA
5.0 PROCEDURE
5.1 Cleaning
5.1.1 Checking Status labeling: Check the status “TO BE CLEANED” on equipment with details filled in. If the next product is the same as the previous product (campaign production), follow the batch-to-batch changeover procedure. If the next product is different from the previous product, follow the product-to-product changeover procedure and follow the shift-end cleaning procedure at the end of the day’s work.
5.1.2 Batch-to-Batch change over procedure (TYPE A): To maintain batch segregation-
5.1.2.1 Remove the “ TO BE CLEANED “ label and affix the “ UNDER CLEANING “ label to
the machine.
5.1.2.2 Ensure that no empty bottles from the previous batch remain in the machine.
5.1.2.3 Carry out wet mopping of the machine followed by dry mopping with a lint-free cloth from outside.
5.1.2.4 Remove all the good and rejected bottles from the area and carry out the reconciliation. Destroy the rejected bottles.
5.1.2.5 Record the details of cleaning in the equipment usage record sheet as per
Annexure- I
5.1.3 Shift end cleaning procedure:
5.1.3.1 Switch off the electric supply from the mains.
5.1.3.2 Close purified water supplies from their respective valves.
5.1.3.3 Close the compressed air supply.
5.1.3.4 Remove all the bottles from the machine and keep them in a closed container with a status label.
5.1.3.5 Open the drain valves of water storage containers and drain out all the water.
5.1.3.6 Remove all the water from the machine by moping with a lint-free cloth.
5.1.3.7 Dry the water storage containers and Drip trays with the help of a lint-free cloth.
5.1.3.8 Mop the complete machine with the help of a dry lint-free cloth.
5.1.4 Product-to-product change over procedure (TYPE B): This procedure is applicable if – there is a change in product or during campaign production, 7 batches have been Processed. Equipment is taken for maintenance during processing and maintenance work continues for more than 24 hours or maintenance work involves any part, that comes in direct contact with purified water.
5.1.4.1 Remove all the good and rejected bottles from the area and carry out the reconciliation. Destroy the rejected bottles.
5.1.4.2 Close purified water supplies from the valve.
5.1.4.3 Close the compressed air supply.
5.1.4.4 Dismantle infeed caps, Spacer bar, bottle holder, and Erector if the next product is not having the same bottle size.
5.1.4.5 Clean the change parts with purified water and a nylon brush.
5.1.4.6 Dry the changed parts and store them.
5.1.4.7 Open the drain valves of water storage containers and drain out all the water. Ensure that there is no water in the water lines if required open and drain the water.
5.1.4.8 Rinse the water storage containers and Drip trays with purified water and dry them with a lint-free cloth.
5.1.4.9 Set the change parts infeed caps, Spacer bar, and Erector of the bottle size for the next product
5.1.4.10 Mop the machine with a dry lint-free cloth.
5.1.4.11 Visual inspection: Check that all the surfaces of the parts of the Bottle Washing Machine are visually clean and dry.
5.1.4.12 Reassembly: Reassemble all accessories and parts dismantled for the cleaning purpose
5.1.4.13 Status labeling: Put ‘CLEANED’ status label having Unit, Department, Equipment name, Cleaned by, Checked by Production Officer, Date, and finally certified by Quality Assurance (QA).
5.1.4.14 Protection of clean equipment: Protect the cleaned Bottle washing machine by covering the water storage containers with SS lid and loading and unloading sides with clean polythene bags if the equipment is not planned for use within a day.
5.1.4.15 Records: Record the details of cleaning in the equipment usage record sheet.
5.2 Machine setup and operation
5.2.1 Machine set up
5.2.1.1 Ensure that the Bottle Washing Machine is cleaned.
5.2.1.2 After line clearance from QA, put the “UNDER PROCESS” label dully filled and signed on the machine.
5.2.1.3 Change/fix the bottle holders as per the bottle size.
5.2.1.4 Set up the drum assembly, infeed guide spacer, and erecter as per the required size of the bottle
5.2.1.5 Air filter for bottle drying is to be changed after every three months and water filters for purified water are to be changed when the water pressure on the pressure gauge comes down under 2 Kg/ cm² or if required earlier.
5.2.1.6 Record the change of filter as per Annexure-I.
5.2.2 Operation
5.2.2.1 Open the valves for the purified water to fill the water containers.
5.2.2.2 Open the air valve and check the wash air pressure from the air pressure gauge, the air pressure should be NLT 2.0 kg/ cm² and mechanical air pressure at 6 kg/ cm².
5.2.2.3 Switch ON the main.
5.2.2.4 If no ERROR message displays on the screen then select MANUAL MODE and observe the machine for proper functioning by starting individual items.
5.2.2.5 Press Pump 1, then Pump 2, and check the respective dial gauge mounted on the panel. The pressure should be NLT 2.0 kg/ cm² for bottle sizes 15ml to 120ml.
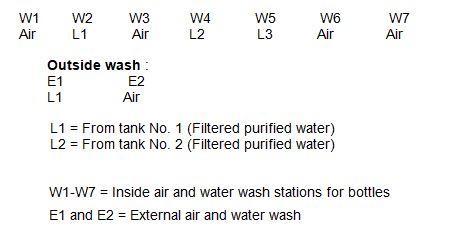
5.2.2.7 Wash Sequence:

Inside Wash: L1 = From tank No. 1 (Filtered purified water) L2 = From tank No. 2 (Filtered purified water) W1-W7 = Inside air and water wash stations for bottles
E1 and E2 = External air and water wash
5.2.2.8 Switch ON/OFF Globe valves 1,2 and 3 and observe they’re properly functioning.
5.2.2.9 Press the key for Pumps & Globe valves again to switch it OFF.
5.2.2.10 Run the Machine Conveyor for a few minutes and observe its free movement & timely movement of pins and erector.
5.2.2.11 Operate the extractor for its proper response by pressing the extractor button.
5.2.2.12 Operate the feed conveyer in Manual mode so that Bottles are available up to the loading drum through the infeed guide.
5.2.2.13 Select AUTO mode. To start the washing operation.
5.2.2.14 Press Cycle start switch ON, Then PLC takes over the Auto operation.
5.2.2.15 First, Pump No. 1 Switches ON.
5.2.2.16 Then Pump No. 2 will get ON with a delay of a few seconds.
5.2.2.17 Turn the machine conveyor ON & then the Feed conveyor will switch ON automatically.
5.2.2.18 In case of improper machine setting, the PLC may show the following faults :
            •   Air pressure low
            •   No Bottles on In feed Conveyer
            •   Low water level in tank
            •  Emergency button is pressed
            •  Jamming of Conveyer
            •  Cam Clutch slipped
            •  Geneva Clutch slipped.
5.2.2.19 Once the error has been removed AUTO mode will work after pressing the RESET button.
5.2.2.20 Start the water pumps and machine and check that water pressure is within the range and uniform flow from all the nozzles.
5.2.2.21 Receive the empty glass bottles from the day store in packed cartons.
5.2.2.22 Remove the cartons and load the bottles on the loading platform. Put the empty cartons in the waste bin.
5.2.2.23 Put any broken bottle in another waste bin meant for damaged bottles.
5.2.2.24 Washed and air-dried bottles will be unloaded automatically on the other side of the machine.
5.2.2.25 After the completion of the operation, Switch the ‘OFF’ Bottle washing machine.
5.2.2.26 Affix the “TO BE CLEANED” label on the machine.
5.2.2.27 Record the details of the operation of the Bottle washing machine in the equipment usage log sheet.
5.3 NOTE:
5.3.1 Ensure adequate oil level by reducing the gearbox.
5.3.2 Ensure air pressure in the unit is not less than
5.3.3 Lubricate daily all moving parts with food-grade oil when the product is coming in contact and grease for closed parts.
Related: Action Plan Of Deviation
6.0 ABBREVIATION (S)
SOP: Standard Operating Procedure.
No. : Number
NA: Not applicable
PLC: programmable logic controller
